Installing TeamViewer
Downloading TeamViewer
In order to download TeamViewer please visit one of the following locations: TeamViewer for Linux, TeamViewer for MacOS or, TeamViewer for Windows. Once you have selected your download please then locate the "TeamViewer Full Client" selection as shown below and click on the architecture you are running. In most cases this will be x86-64 the image below shows an example of what you should be downloading:

At this point your download should start and you should be ready for the next step.
Installing TeamViewer for Windows:
Depending on your browser, you will either need to press the Ctrl + J buttons to show your download history (this option should work for FireFox, Microsoft Edge and, Google Chrome). Once the key combination has been pressed, you should see something similar to the graphic below in your web browser:
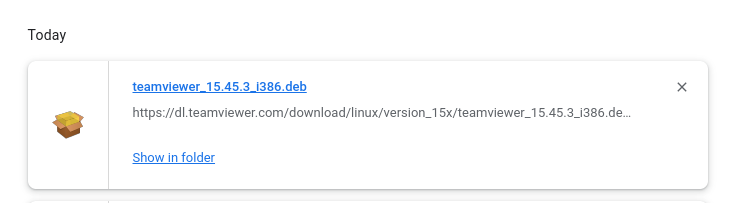
From here, you can opt-in to "Show in Folder" Where you can double-click to start the installation of the TeamViewer Application.
Installing TeamViewer for Linux
The instructions for downloading teamviewer are the same. However, you will be utilizing the: TeamViewer for Linux link and following the installation of the .DEB files (as our client systems are Ubuntu / Debian based).
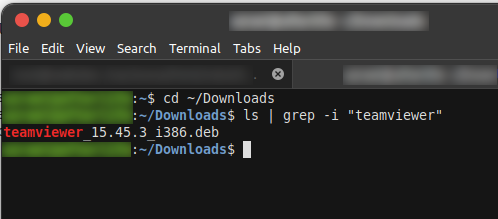
Once the download has completed, you will need to open a terminal window and, you will need to perform the following commands:
Press the ALT + F2 Keys to display the dialog.
Within the dialog enter: gnome-terminal then press enter.
within the terminal enter the following commands:
cd ~/Downloads
ls | grep -i "teamviewer"
At this point you should see something similar within the terminal as follows:
Remember the name as you will be entering the following commands (Please note your administrative password or, a user with sudo privileges will need to be accessible in order to install this software)
sudo dpkg -i teamviewer_15.45.3_i386.deb
Once this command is supplied, you will be required for your user password and the software should be installed without any issue. Should you have any issues installing the software, please do let us know!
Installing TeamViewer for MacOS
Again, the installation instructions to download are the same for all the operating systems in which we cover and troubleshoot. In this instance you should be utilizing the: TeamViewer for MacOS link. In this instance you will be installing the full client, installing the .DMG file and following the prompts to install.
Requesting Support
Should you require remote support, please utilize the following link: Network Defense Solutions, Inc. - Remote Support and fill out the necessary information. Please do not forget to include you remote support session ID which can be seen in the example below:
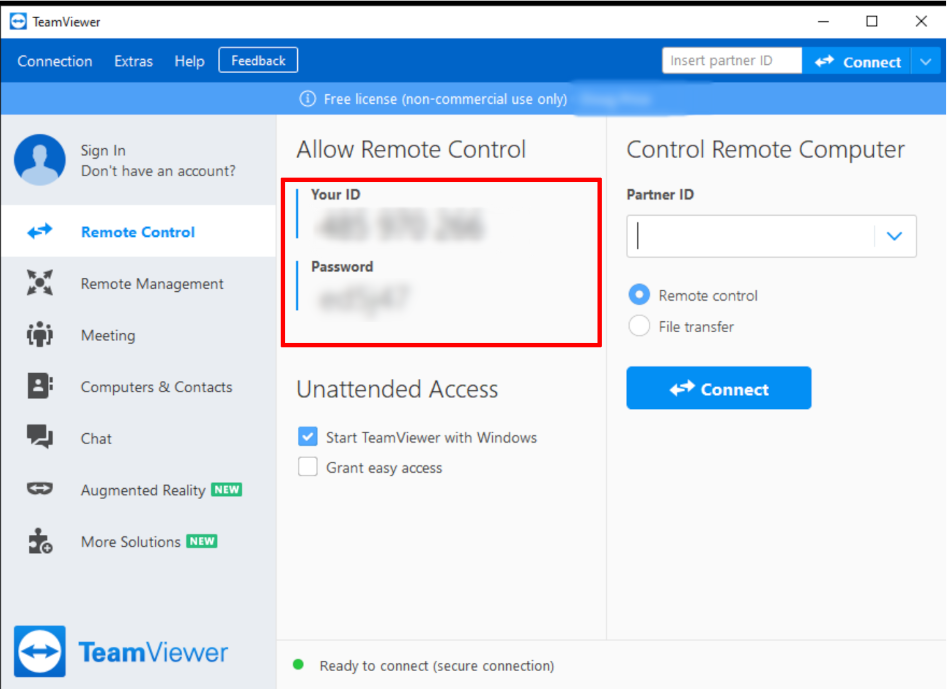
The example above shows the information you will need to include in your remote support request and, have ready when a representative contacts you to begin the repair process.