Synology UPS Setup
For users who are looking for an additional layer of data protection during a power outage or, in the event of a brownout, line-spike or a blackout this article will help you find a UPS (uninterruptible power supply) for your Synology nas and help you setup an automatic shutdown when power is no longer supplied to your RAID/NAS.
The main purpose of a UPS is to keep the data on your Synology RAID / NAS device safe from corruption. This can be in the form of data that is in the middle of a read/write when the power is cut and the result is a corrupted file, folder or damaged volume. In order to prevent a costly rebuild or, repair (even a potential data recovery) investing in an inexpensive UPS would help alleviate this issue.
There are options you can use in order to select a UPS that can provide you with more than just a backup for / during a power outage but also provide you with surge suppression. This can also help protect you in case of a lightning strike to your communications line or service coming into your home / office. This document will not cover the joules rating and what you should select. Please consult an electrician or the manufacturer for this information regarding these specification(s).
Installation
Once you have settled on a UPS to use with your RAID, there will be some cables within the box that you should be aware of. One of them is an RJ45-USB (Serial) connection that communicates with your synology device in order to safely shut it down in a power outage situation. The cable(s) that you are looking for within your packaging are as follows:
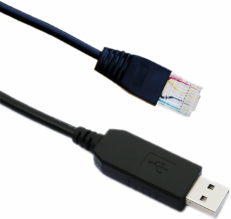
USB to RJ45 Serial connection for powerchute UPS.
The connection port will be labeled in your documentation as a serial port (which looks like a standard RJ45). Once you find the serial port (shown below) you will plug the RJ45 cable into that port and insert the USB into an open port on your Synology NAS. The serial port appears as follows:

Serial port location on Synology.
Once the cables are connected from the UPS so the RAID you will need to configure the Synology software and make sure your UPS is detected.
Configuring Synology with UPS
Once you log into your system, you will need to click on the following options in order to find the power settings.
- https://yoursynologyip
- Click on your start menu (top-left corner)
- Locate the power options
- Select power and then click on "UPS" within the new dialog.

Synology start menu.
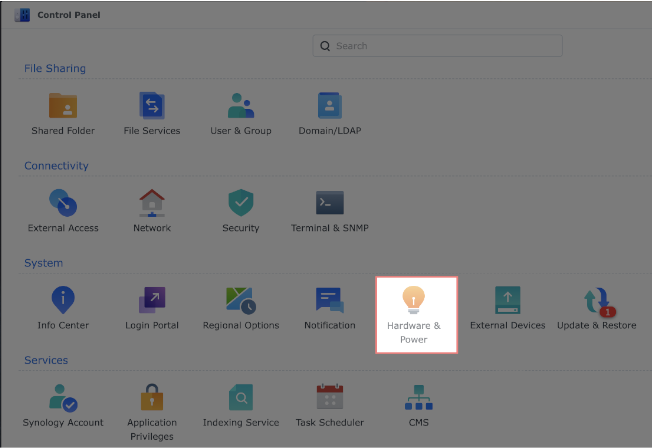
Synology Power Options in Control Panel.
Synology Power Options in Control Panel.
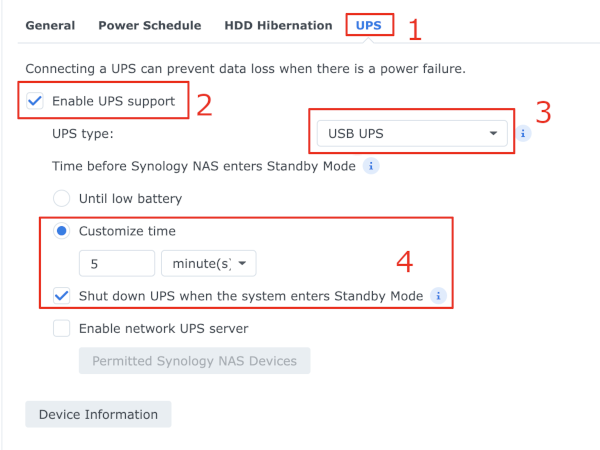
If you have configured the UPS as it is in the images in the above examples, you can click on the "Device Information" and see what information is returned for your UPS. If no information is provided or, the option is not available your UPS was not detected or is not powered on.
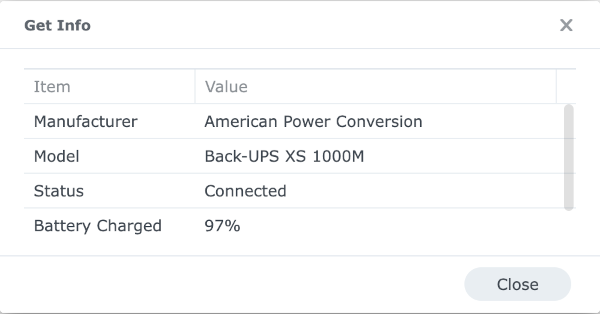
Synology UPS information
If your Synology is providing information about your UPS you have successfully configured the UPS and NAS to communicate with one another in the event of a power outage. If you are having issues configuring your NAS and UPS device you can call us at: 347-586-9386 or, use our Service Inquiry Page and select the "RAID / NAS Data Backup & Disaster Recovery" under the Service Type for help and support. Please note that customers without an active service contract will be billed the standard rates for remote support and, RAID / NAS setup.